
This is my second sourdough post. The first was back on January 15, 2013 and I’ve been baking sourdough off an on since then. Usually the off is related to killing a sourdough starter by doing something idiotic like forgetting to put it in the refrigerator before heading off on a two week vacation. But, something always brings me back, usually it’s just that I like making sourdough, but this time around it was that people decided to bake bread when the world shut down and there was suddenly a shortage in packaged yeast. Apparently no one let the general public know that you can pull yeast from thin air just by letting flour and water sit in a bowl.
I’ve modified my care and feeding regime a couple of times in the past 8 years (I’ve added edits at the end of the original post so scroll down to see my latest opinion), but the principles remains the same. Mix flour and water. Add more flour and water, etc.
As I’ve mentioned before, I’ve also started brewing beer since then. And from the beer, we get what I’m calling beer flour which is neither beer, nor flour. It is spent brewing grains (usually barley and rye), dried out and chopped to near powder in a food processor.
So, you’ve probably already guessed this by now, but this bread has no beer in it. It uses the beer flour to replace some of the regular bread flour to make a healthier and tastier bread!
It may seem like this is taking a long time, but most of that is just walking away and letting things develop slowly. If you’re hoping to whip this up for an impromptu snack, keep dreaming.
Equipment:
- Stand mixer with dough hook or forearms of steel
- 1 large bowl if using a stand mixer, 2 large bowls if equipped with forearms of steel
- Oven that goes to 550ºF (290ºC)
- Plant mister full of water
- Bread stone or baking sheet
- Baking peel (also handy for pizzas) or rimless baking sheet
- Sturdy spoon
- Kitchen scale
- Plastic wrap
- 1-4 Clean dish towels
- Roasting pan
- Colling rack
Ingredients:
- Sponge
- 1 cup sourdough starter
- 500g (1lb 2 oz) white bread flour
- 650 ml (2.75 cups) water
- Loaf
- 500g white bread flour
- 120g beer flour plus extra for dusting
- 5 teaspoons salt
Time: about 1 hour active spread out over the whole time, 36 hours total.
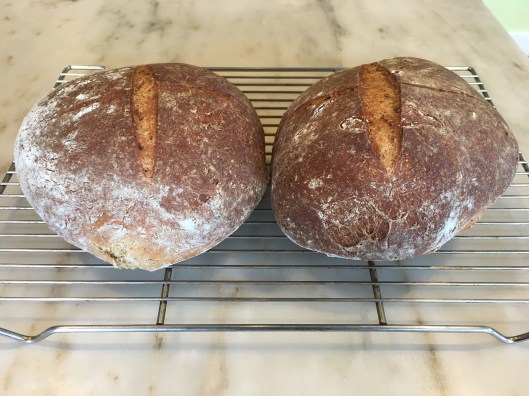
Yield: 2 10-12″ round loafs.
Process:
- In the morning after breakfast, mix the sponge ingredients together in a bowl. You can use the stand mixer for this as you can then let the sponge sit in the bowl.
- Cover bowl with plastic wrap and let it sit in a room temperature place out of direct sunlight all day, 10-12 hours.
- Mix the loaf ingredients in a large bowl and cover with a clean dish towel. You could do this later, but doing it now makes the later process go a touch faster and the later
- After dinner, add the dry ingredients for the loaf to the sponge and mix. Use a spoon if mixing by hand, the dough hook on the lowest setting if using the stand mixer. If using a stand mixer, let it keep going until the dough ball is pulling away from the bottom sides cleanly and then let it knead for about 7-10 minutes.
- Wipe out the large bowl you mixed the dry ingredients in with a dry towel and then coat sparingly with oil. I usually do this by putting the bowl on the counter and spinning it while I drizzle oil down the side of the bowl. The would be a ridiculous way to use an old record player.
- Spread some extra flour (all purpose, bread, whole wheat, whatever you’ve got) on your work surface then turn the dough out.
- If you’re not using a stand mixer, now you get to knead for about 10 minutes until the dough is feeling elastic and has lost most of its stickiness. When you’re done, roll it onto a ball.
- Starting with the side farthest from you, smush down and stretch the dough and then pull it back over the ball of dough like a flap.
- Then pick a side left or right and repeat.
- Do the same with the other side.
- Now do the same to the side closest to you but pul it as far over the dough ball as possible without tearing the dough. You’re basically making an envelope and the purpose of this is to provide an uninterrupted top to create surface tension and hold in the air the yeast is creating.
- Place the ball in the oiled bowl envelope side down, smooth side facing the ceiling.
- Cover the bowl with plastic wrap and put it in the refrigerator overnight. You can leave the work surface all messy with flour since you’ll be back at it in the morning. Or if you happen to be/live with someone who is anal retentive, clean it up. It’s your kitchen after all.
- In the morning, after breakfast, roll the dough out onto a floured work surface and repeat steps 8-12.
- Put the ball back in the bowl and cover with a clean dish towel.
- Walk away for an hour and do something.
- Roll the dough out onto the floured work surface again and repeat steps 8-11.
- Leave the ball of dough on the counter with the envelope side down, smooth side facing the ceiling, covered with a clean dish towel (Tip: you can use the same towel from before if you aren’t a neat freak).
- Walk away for an hour and do something.
- Split the large ball into two relatively equal halves.
- Repeat steps 8-11 with each half making 2 balls.
- Place the balls of dough on the counter with the envelope sides down, smooth sides facing the ceiling. They should have some space between them because they are going to expand a bit and you don’t want them sticking together.
- Spray with the plant mister and sprinkle with extra beer flour. The extra beer flour isn’t required, but it will look pretty and if you’re actually brewing you have more of the stuff than you can probably use if you’re not running a bakery.
- Use a knife or razor blade to cut some slashes in the top, about 1/4″ deep though you can go deeper if you want. I usually cut a square but I’ve also done two parallel lines, triangles, an X across the top, even a circle once (but that was a disaster). These are required as they provide a means for the dough to expand as the air you’ve trapped with your surface tension heats up.
- Cover the loaves with a clean dish towel (Tip: you can use the same towel from before and it should be able to cover both loaves unless you are using a really weird, small dish towel).
- Fill the roasting pan about half way with water and put it on a rack in the lowest slot in your oven. Put another rack with the baking stone or the cookie sheet in the next slot that will allow for a little room above the roasting pan for steam to escape.
- Set your oven to 550ºF (290ºC) and walk away.
- When your oven hits the target temperature, sprinkle some beer flour on the peel or rimless baking sheet like you would if you were putting flour on the work surface. This is to help the loaves slide off into the oven.
- Gently place the loaves on the peel/baking sheet on top of the flour close to the edge. If you have to do this one at a time, that’s okay.
- Spray the tops of the loaves again.
- Open the oven and slide the loaves onto the stone/baking sheet as quickly as you can then close the oven and walk away.
- After 15 minutes, open the oven and have a look. The loaves should have risen and the crust should be showing some color. The amount of color determines where you are going to set your oven next: If it’s super light like a pair of khaki pants, set the oven to bake at 400ºF (205ºC).f it’s a shade or two darker like a cardboard box, set your oven to 350ºF (175ºC). If it’s dark like mahogany, you can go as low as 300ºF (150ºC). Eventually you will get a sense of what you like after a few times doing this but this is a good starting point.
- Walk away for 35-45 minutes. You should return to check on your roasting pan after 15 minutes. If the water is gone/almost gone then you can take it out and let it cool as it’s not accomplishing anything at that point.
- Remove the loaves to a cooling rack and let sit for another half hour. It’s super tempting to hack off a slice right away, but if you put your ear close to the bread (be careful not to burn your ear or you’ll be the Van Gogh of bakers) you can actually hear it crackling … it’s still cooking.
- When you’ve waited a half hour (no … not 25 minutes), carefully cut your loaf and have a taste.
- Store in a paper bag or a bread box.
Notes:
- The heels of a home made loaf rarely get any love. But they aren’t totally useless. I freeze them in a ziplock freezer bag and then thaw them out now and again to make croutons for a caesar salad, panzanella, or for onion soup.
- You could make one loaf at a time and put the other half of the dough in the freezer. If you’re going to do that, put it in a freezer bag and stick it in the freezer right after you’ve split the original dough ball in two. Then once it’s thawed out (24-26 hours in the fridge, 6-10 hours on the counter), start at step 22.

Pingback: Sourdough Beer Bread — Practically Eating | My Meals are on Wheels
Pingback: Spent Brewing Grain Flour: Getting Really Practical … | Practically Eating