
Tags
Most of us are used to getting the American version of fettuccine Alfredo which is adulterated with cream and weird proteins. Legend has it that the dish was “invented” by a doting husband trying to give his wife something to eat that she could keep down in the throes of morning sickness. Basically, it was what every Italian mother feeds their kid when they have an upset stomach: plain pasta with butter and a little parmesan for flavor. Alfredo (the doting husband/hero of our story), thought it was tasty and easy to make so he threw it on the menu, simply serving whatever past happened to have been made fresh that day with butter and parmesan.
On a day when he happened to have made fettuccine, two fancy American movie stars (Douglas Fairbanks and Mary Pickford) popped into his restaurant on their honeymoon. They were so enamored of this “Fettuccine Alfredo” that they asked for the recipe (see below) and sent him a picture of themselves in his restaurant along with a gold spoon engraved with “to Alfredo The King of the noodles” and their names.
Evidently, Alfredo was something of a PR genius because soon the newspapers were reporting his status as a Hollywood darling and more movie stars began showing up adding more photos to his collection. Eventually he sold the original restaurant and later opened up a competing restaurant with his son (I can’t seem to find out if this was the son that was causing the morning sickness which would bring this whole thing full circle quite nicely), and both restaurants claim to be the “inventor” of the dish.
Not surprisingly, the pasta with butter and parmesan that mom used to feed you when you had an upset tummy did not take off as a restaurant dish in Italy and it is reported that the only places you can find “Fettuccine Alfredo” in the whole country is in those two restaurants. I suppose the US equivalent would be walking into Spago and seeing saltines and ginger ale.
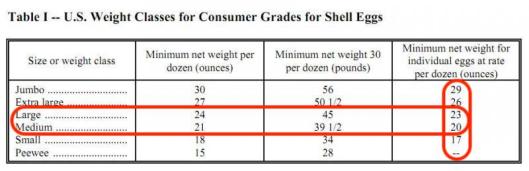
In any case, here we have what is purported to be the “original” recipe for the Alfredo part. The actual pasta recipe is something that needs a little chalk talk. You will see there are quantities in the recipe. This is based on the eggs I use which are from the farmer’s market which are variable in size but usually range from Medium to Large. The size of eggs is actually something determined by the USDA and most recipes will just say “Use X eggs” assuming you are going to go and buy large eggs. But, as you can see in the chart below, especially when it comes to baking and pasta, that can get really out of whack of you are using jumbo eggs and the person making the recipe is using medium eggs. It’s nearly a 50% increase in egg. For pasta, this isn’t such a big deal, especially as my “method” calls for making a slightly wetter pasta dough and then adding flour as you laminate to get it right. The theory being it’s easy to add a little flour than it is to add a little egg. Though you could actually add water, it’s just not how I roll.
I know I have posted many recipes extolling the virtues of the stand mixer, but usually that is in the context of it being able to perform annoying tasks that would require forearms of steel. In the case of rolling pasta, acts as a third set of hand. If you buy a hand cranked pasta roller, nothing will be significantly different except that you will be down a hand as you will require one hand to crank the pasta roller. And, truth be told, you actually don’t technically need a pasta roller at all. You could achieve the same results using a rolling pin, and cutting the noodles with a knife, it just wouldn’t be as precise. But who knows, that may be your thing. For the purposes of this recipe, I’m going to stick with the stand mixer since if you are using a hand roller, nothing is significantly going to change, and if you’re enough of a badass to feel comfortable rolling out pasta noodles with a rolling pin, you don’t need a silly cooking blog from some random dude to tell you how to do it. Similarly, when it comes to cutting the noodles, you can also forgo the pasta cutter and use a knife if you choose to do so.
A warning: The dried pasta you get in the store is generally semolina pasta which is just semolina flour and water which is a type of pasta that dries better and is more shelf stable because it doesn’t include eggs. If you eat these noodles, the people you cook for will think you are a genius and will never want to go back to dried store bought pasta which means once you’ve done this, you may be doomed to repeat it. Or find a new family/group of friends.
Final admonition: Use fresh parmesan, the kind that comes is a weirdly shaped block. Not the kind that comes in a cardboard tube with a shaker lid.
On with the Alfredo!
Equipment:
- Stand mixer with pasta laminating and cutting rollers
- Small mixing bowl
- Salad fork
- Large pot
- Microplane or cheese grater with small holes
- Wooden spoon
Ingredients:
- Pasta
- 2 eggs plus one yolk
- 1 cup flour, all purpose will work, 00 flour is even better if you can find it.
- 1/4 teaspoon salt
- More salt for boiling
- Alfredo
- 2/3 cup reserved pasta cooking water
- about 1 cup microplaned/finely grated parmesan cheese plus more to grate on top before serving
- 4-6 tablespoons butter
- Maybe some fresh ground pepper
Time: about an hour and a half
Yield: This will feed 6 people easily. My wife would tell you that you need to have some kind of vegetables so maybe a side salad of some sort would be a good idea.
Process:
- Clean off a good chunk of counter space. I use a 3×4′ island in the middle of the kitchen.
- Crack two of the eggs into the bowl and then separate the third egg and put the yolk in the bowl. You can toss the white or save it for something else like meringues or cocktails (recipes to follow).
- Put the cup of flour on the clean work surface and make a little well big enough to hold the eggs in the middle. I find a well of about 3 or 4 inches diameter works nicely. Essentially you are taking a mountain of flour and turning it into a volcano.
- Pour the eggs into the well taking care not to burst the wall of flour.
- Sprinkle the salt on the eggs.
- Using a fork (I use a salad fork, I have no idea why so you pick whatever fork works for you), stir the eggs in the well, Slowly incorporate the flour into the eggs.
- After a while a dough will begin to form. When this happens, use your hands to knead the dough a couple of times incorporating as much of the flour as you can into the dough.
- When the dough is smooth, form it into a ball and cover it with a clean dish towel. Then let it rest for at least 20 minutes.
- Get your pasta roller all set up and ready to go
- If you are intending to freeze the pasta for later use, see the note at the end of this recipe and skip to step 27. Otherwise, after the dough has rested, put a pot of water on to boil. I use a 6 quart stock pot with about a gallon of water.
- Cut the dough ball into four equal pieces (after you have removed the towel …) then move them to the side then sprinkle your work surface liberally with flour. The cut sides of the quarters should be slightly tacky. I like to start with my pasta dough a little wet because it’s very easy to add flour during the laminating process but it’s very difficult to add moisture.
- Set your pasta rollers to the widest setting (on mine, this is 1) and turn on the mixer assuming you are using a stand mixer for this. Run the first pasta piece through. It should be kind of crumbly and look like you’ve screwed up completely. That’s normal. Fold it in half and run it through again. This time it should look less screwed up. If at any time it seems like it is sticking to the rollers, simply lay it in the flour on the work surface so it picks up a little bit and then fold it over again and run it through the rollers. Keep folding and rolling until you have a smooth sheet.
- Before you go any farther, a quick note: If at any point during the thinning process, the dough should tear/stick/whatever, simply fold it in half, go back one number, and run it through again. There are no points deducted for having to go back because there is no one keeping score.
- Set the rollers to the next thinnest setting (for me this is #2) and run the sheet through.
- Set the rollers to the next thinnest setting (for me this is #3) and run the sheet through.
- Set the rollers to the next thinnest setting (for me this is #4) and run the sheet through. (Are you sensing where this is going?)
- Set the rollers to the next thinnest setting (for me this is #5) and run the sheet through.
- Set the rollers to the next thinnest setting (for me this is #6) and run the sheet through.
- On my rollers, #6 is the second to thinnest setting. This is the final roll for noodles. #7 is for ravioli which is stuff sandwiched between two layers so you want super thin pasta.
- Lay the finished sheet on the work surface and cut it to half the length. lightly sprinkle the top with flour.
- Repeat steps 12 through 20 with the other 3 blobs of dough. You should end up with 8 sheets of dough.
- Turn off the mixer and switch to your fettuccine cutting attachment.
- Run one sheet through, put the cut noodles back on the work surface
- Sprinkle with flour and toss gently to coat all of the noodles.
- Repeat steps 23 and 24 with the other 7 sheets.
- IF YOU ARE FREEZING THE PASTA: Put the cut noodles in a rigid storage container like a tupperware or a jar or something that is not susceptible to being smashed and put it in the freezer.
- Assuming your water is boiling by now, add a bunch of salt to the water and put the pasta in the water. If you are using frozen pasta, and starting here, put a pot of water on to boil. I use a 6 quart stock pot with about a gallon of water. When it is boiling, add a bunch of salt then your pasta
- After about 2-3 minutes fresh/7-8 minutes frozen, your pasta will be cooked and you should remove 2/3 cup or so of the water (this is not a critical measurement) and set it aside.
- Drain the pasta in a colander in the sink and then put it back in the pot.
- Turn your burner down low (I set mine to 2) and put the pot back on it.
- Add the butter and stir until it’s pretty much melted.
- Add the grated parmesan and the reserved water and stir until everything is incorporated. Sometimes I give it a little grinding of black pepper. Sometimes I don’t. If you’re going to add pepper, now’s the time to do so.
- Do nothing for 2 minutes.
- Turn off the heat and stir.
- Do nothing for one minute.
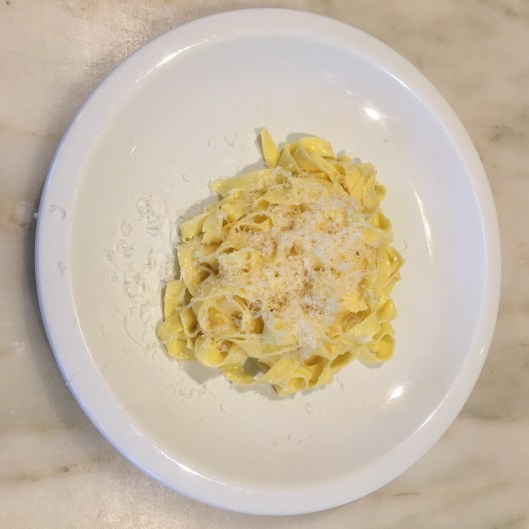
- One last quick stir, then plate the pasta and grate a little extra parmesan on top.
- Be amazed!
Notes:
- This makes enough pasta for two meals for us (we are a family of 3). I usually take the second half of the pasta and cut it into noodles to be frozen and used later. Freezing a lump of uncut dough has never worked for me, there may be a way to make it happen, but I haven’t found it.
Sometimes, in an effort to save time for meals during the week, I will split the noodles into two batches and freeze them both for later use. If you use frozen fresh pasta, do not thaw it out when you want to use it. Simply take it directly out of the freezer and put it into boiling salted water and leave it there for about 7 or 8 minutes instead of 2 or 3. Obviously, if you are using frozen pasta for this recipe, you can skip the making pasta part and just start at step 27 after you have boiled the noodles.

Pingback: Pandemic Diaries – Entry 5 | Practically Eating